
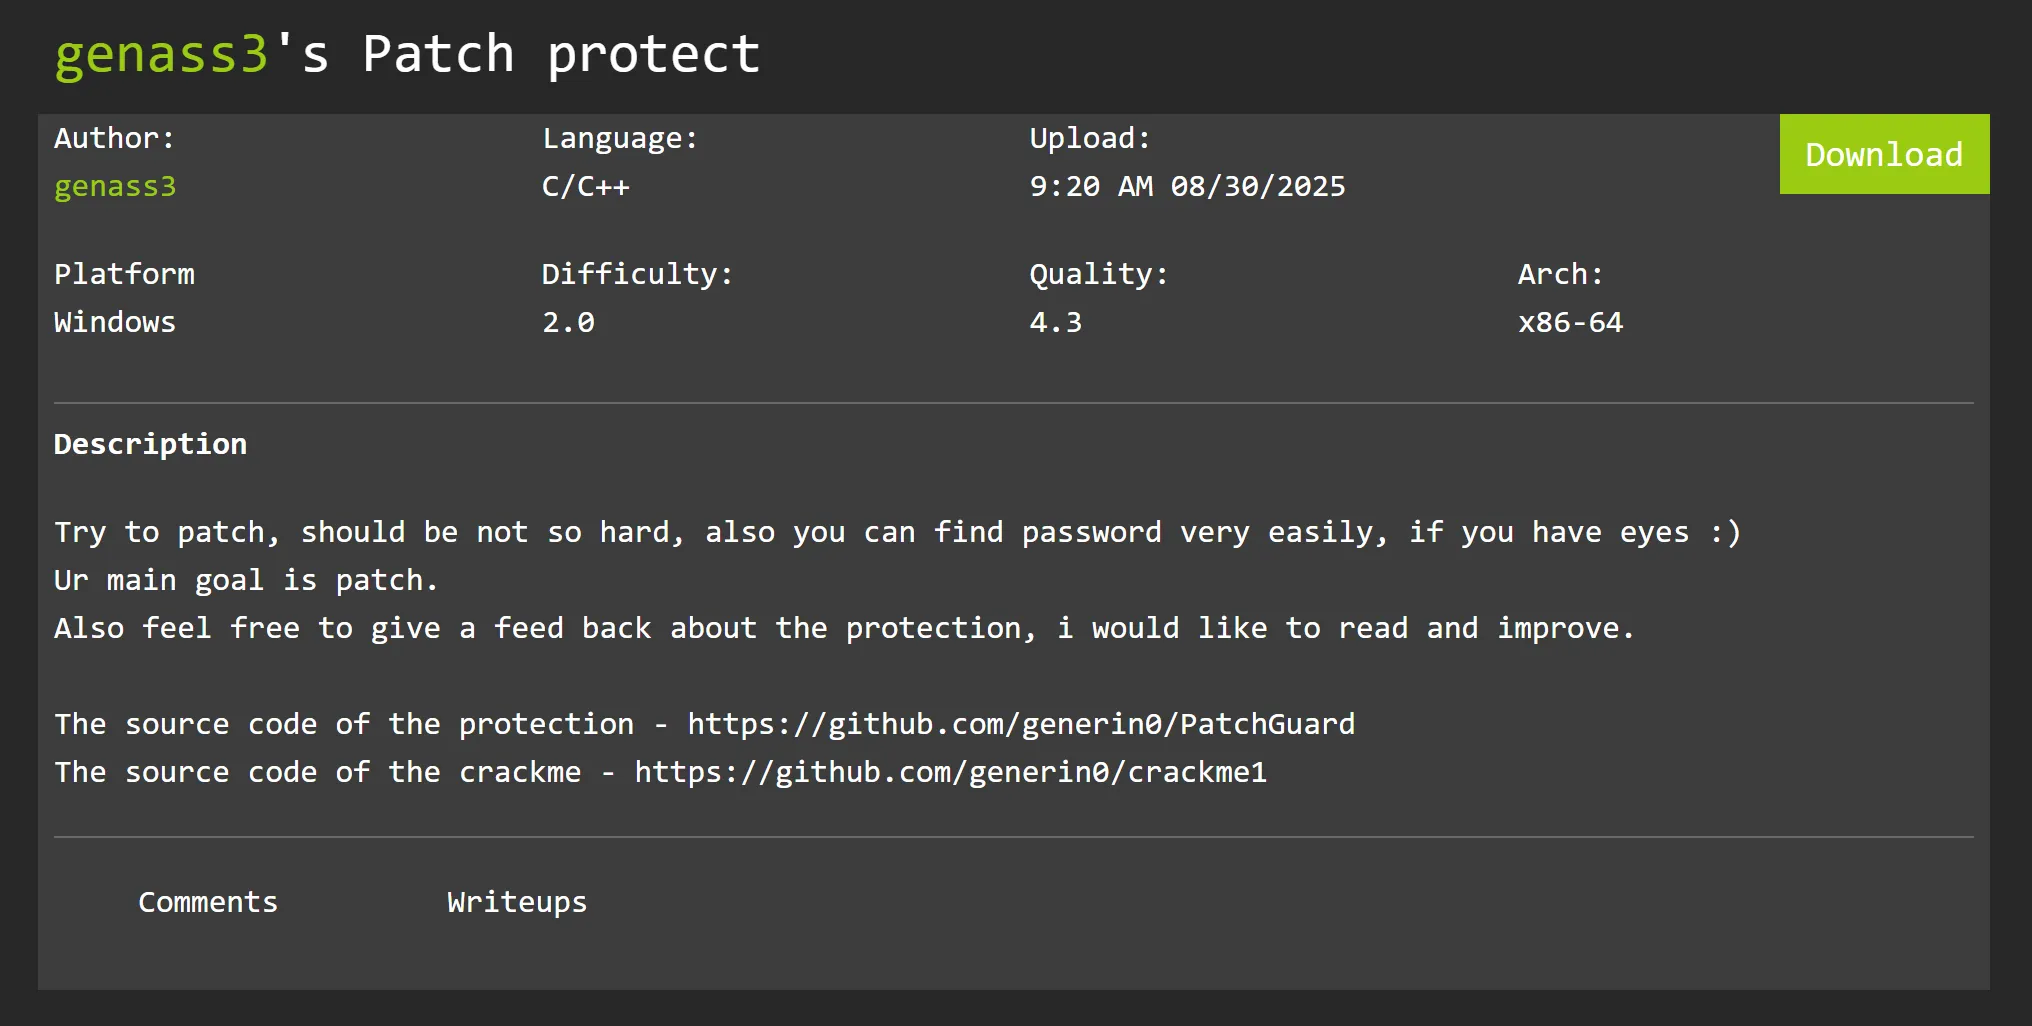
Crackme Exploration
The crackme asks for a key. If we supply it with some random text, it’ll display a MessageBox with a beeping sound.

The name and description imply that we’re supposed to patch the crackme. In this write-up, we’ll be finding the key first (should be easy I guess) and then focus on bypassing the patching protections.
Finding The Key
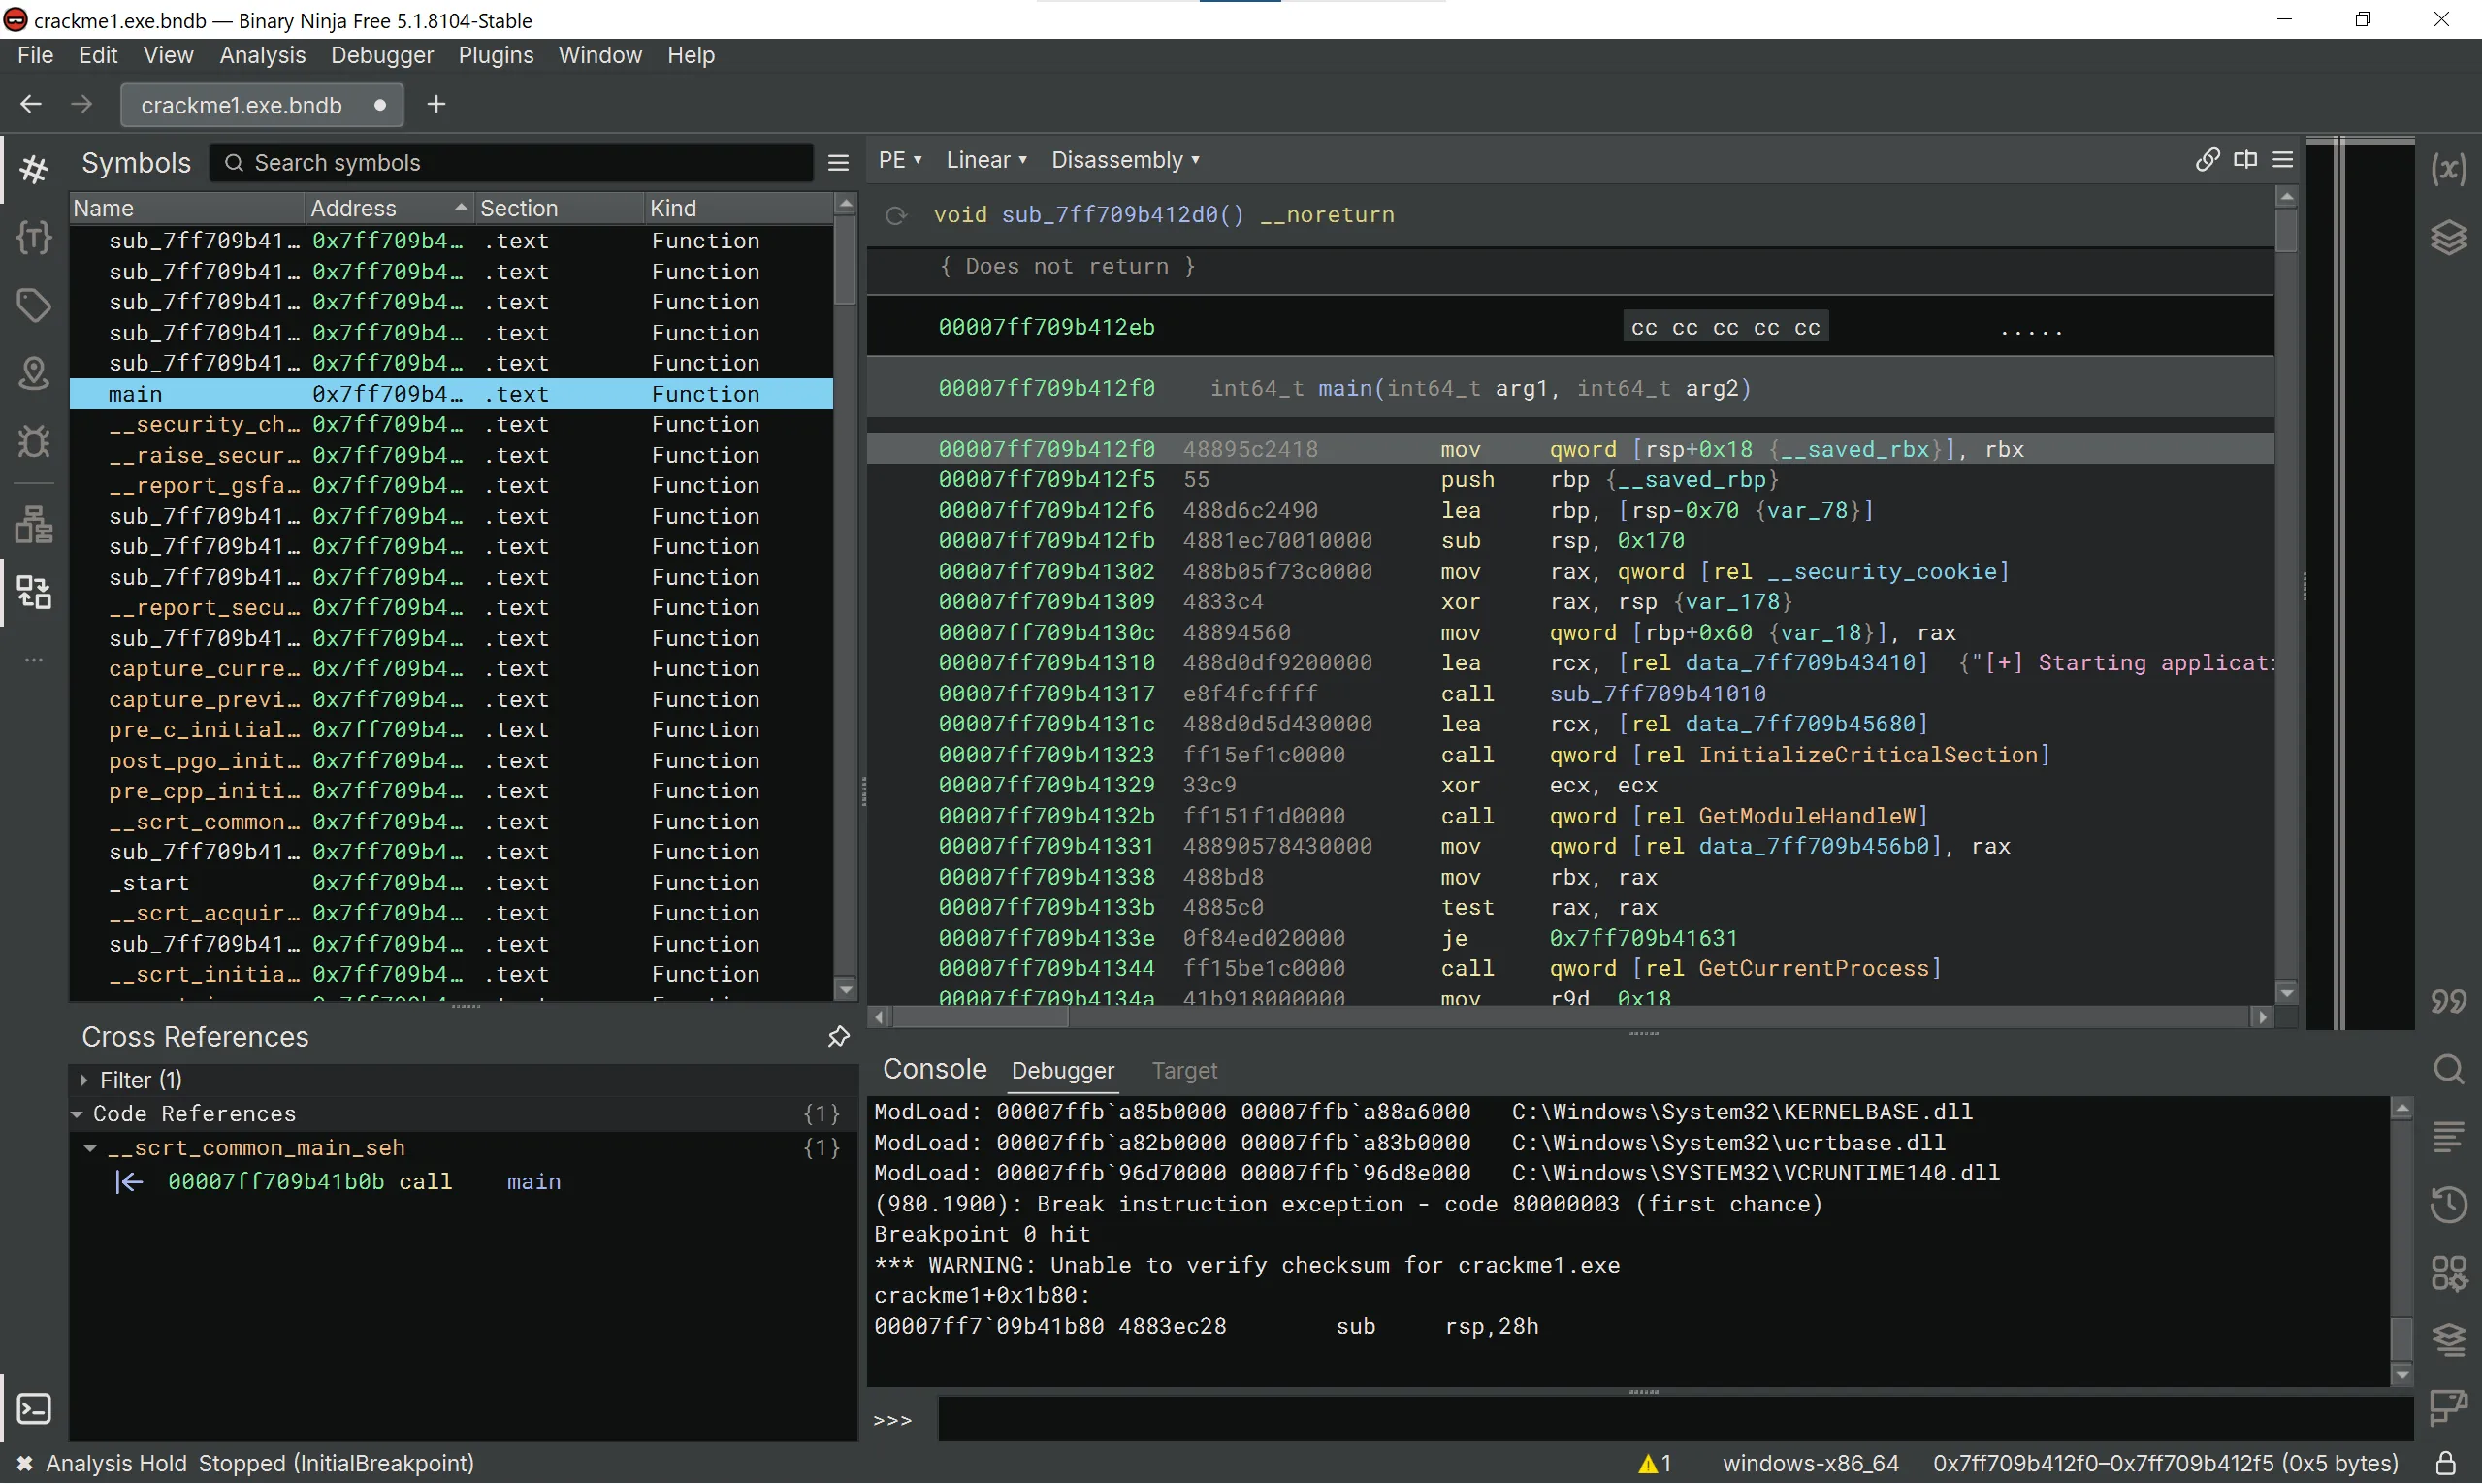
Let’s decompile the crackme using Binary Ninja. We’ll skip the CRC protection and the MessageBox/Beep loading.
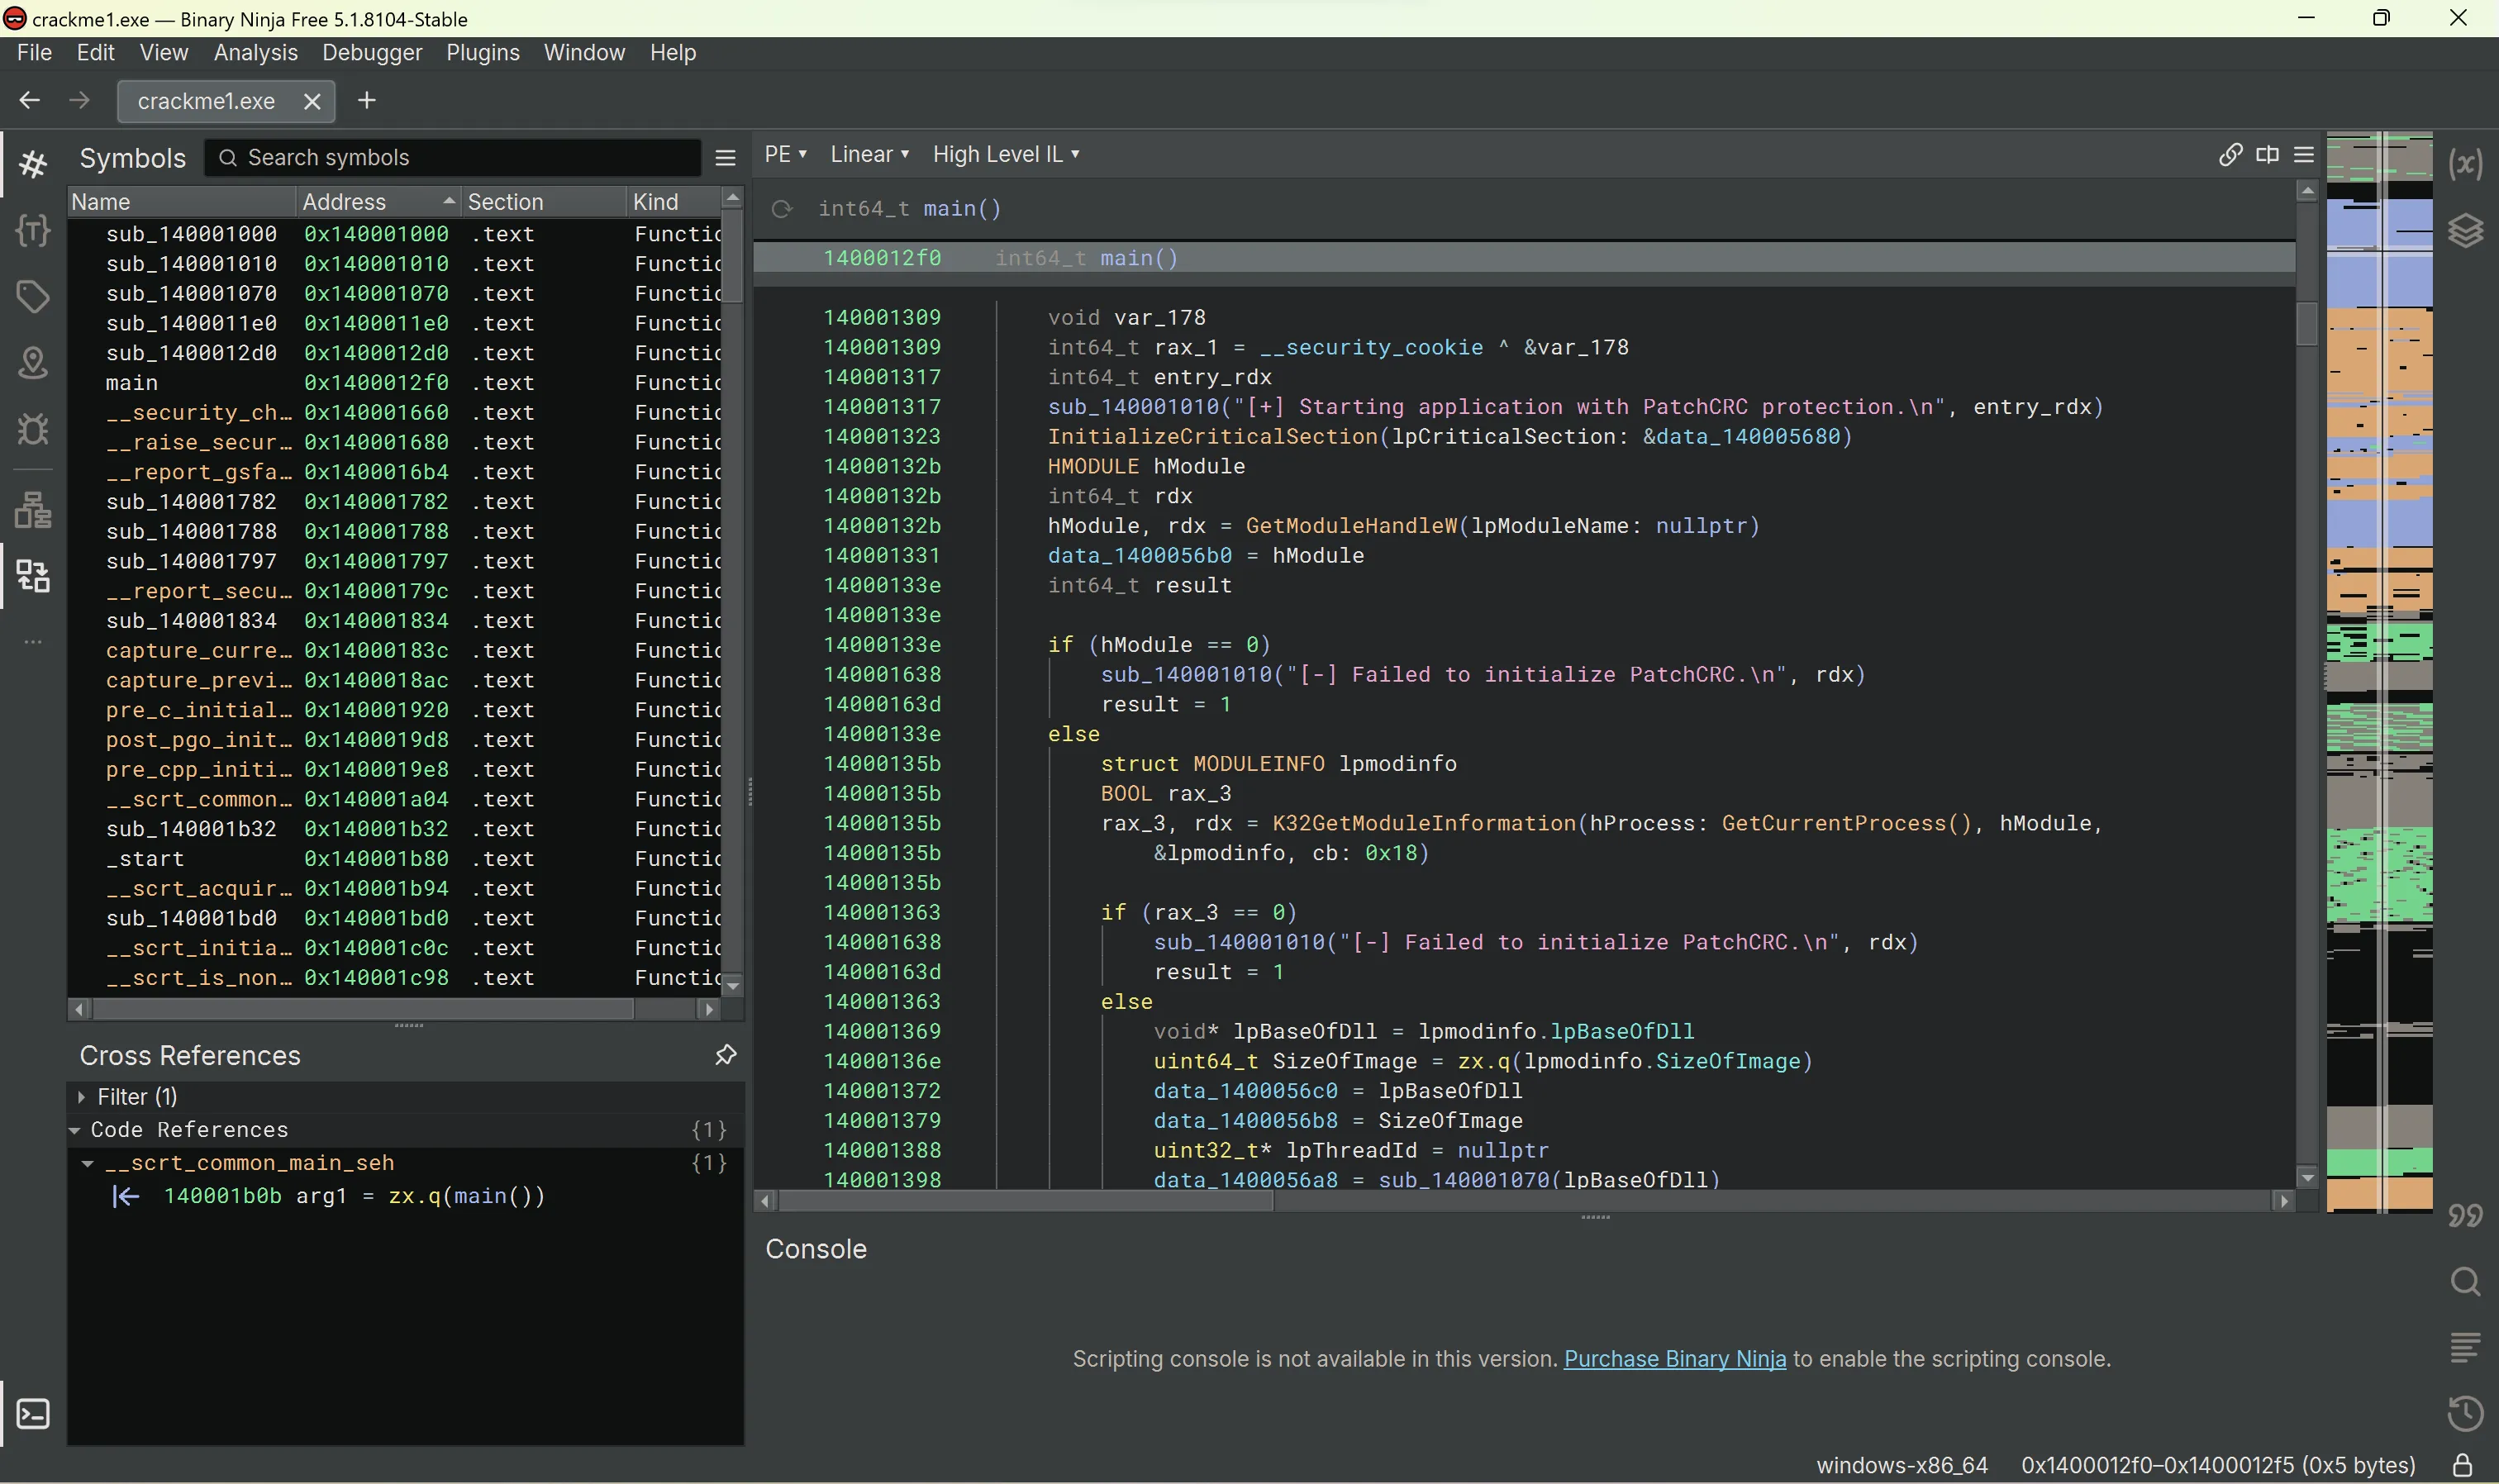
If we scroll down a little bit, we can see the part where the program stores our input to var_118 and likely to construct the expected key in var_128:
__builtin_strcpy(dest: &var_128, src: "GUGPUGP")
sub_140001010("%s:", &var_130)
fgets(_Buffer: &var_118, _MaxCount: 0x100, _Stream: __acrt_iob_func(_Ix: 0))
uint64_t rax_10 = strcspn(_Str: &var_118, _Control: U"\n")

if (rax_10 u>= 0x100)
    sub_140001788()
    noreturn

var_128:1.b ^= 0x33
i = -1
var_128:2.b ^= 0x33
var_128:3.b ^= 0x33
var_128:4.b ^= 0x33
var_128:5.b ^= 0x33
var_128:6.b ^= 0x33
var_118[rax_10] = 0
var_128.b = 0x74
A bit further down, we can see the crackme compares the length of our input with the expected password…
do
    i += 1
while (*(&var_128 + i) != 0)

int64_t rax_11 = -1

do
    rax_11 += 1
while (var_118[rax_11] != 0)

if (i == rax_11)
    break
… and does a comparison of the two strings:
do
    if (*(&var_128 + rax_12) != var_118[rax_12])
        goto label_140001613

    r8_3 += 1
    rax_12 += 1
while (sx.q(r8_3) u< i)

rbx_3(0, "Welcome", "Great job", 0)
Based on the above key-constructing logic, we’ll create a Python script to XOR each byte of the string GUGPUGP with 0x33, set the first byte to 0x74, and decode it into ASCII:
src = bytearray(b"GUGPUGP")
for i in range(1, 7):
src[i] ^= 0x33
src[0] = 0x74
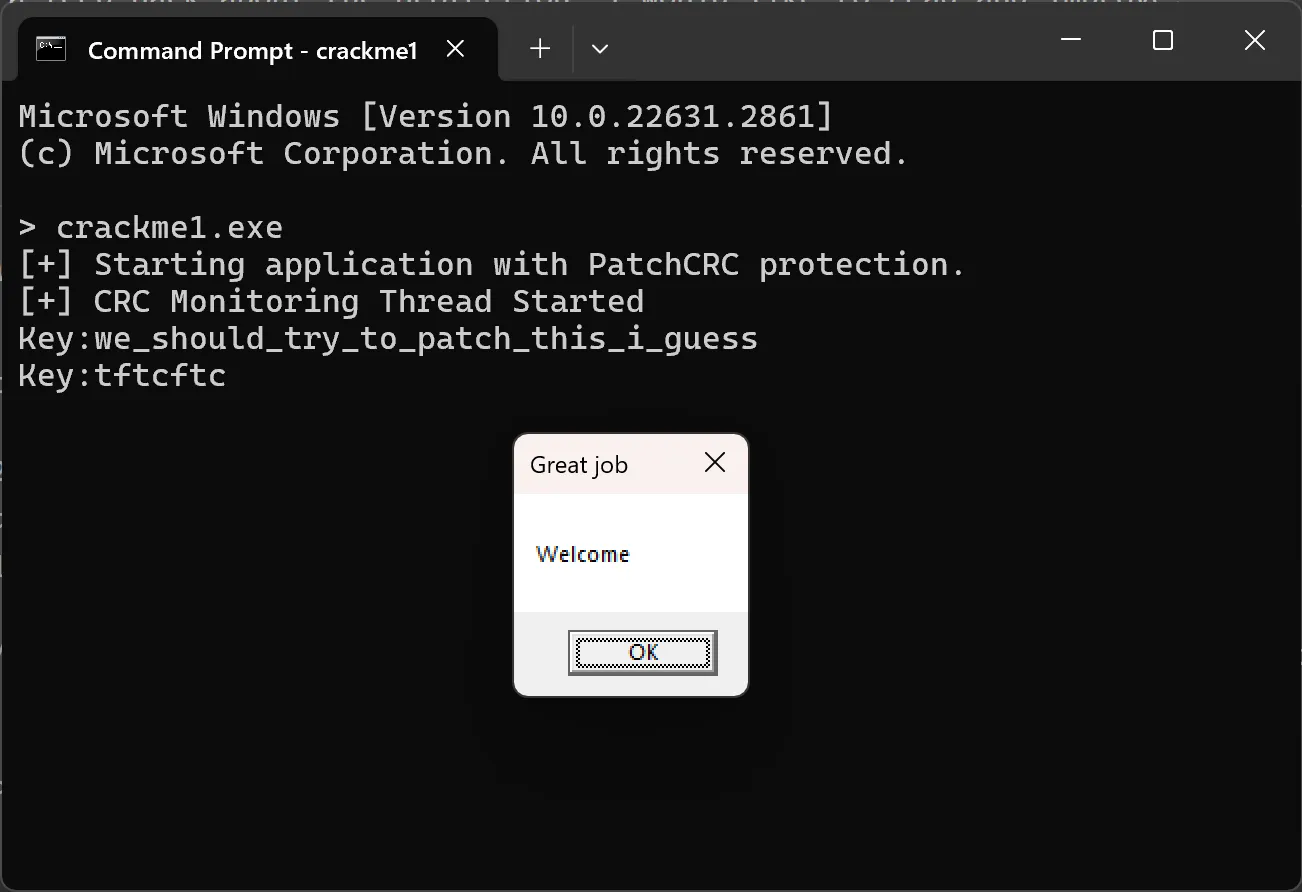
print(src.decode("ascii"))Running the script reveals the key tftcftc.
Patching The Crackme
These are some approaches that we can use to solve the crackme without finding the correct key. A debugger can help us with this. Let’s head to the Debugger pane and press Launch.
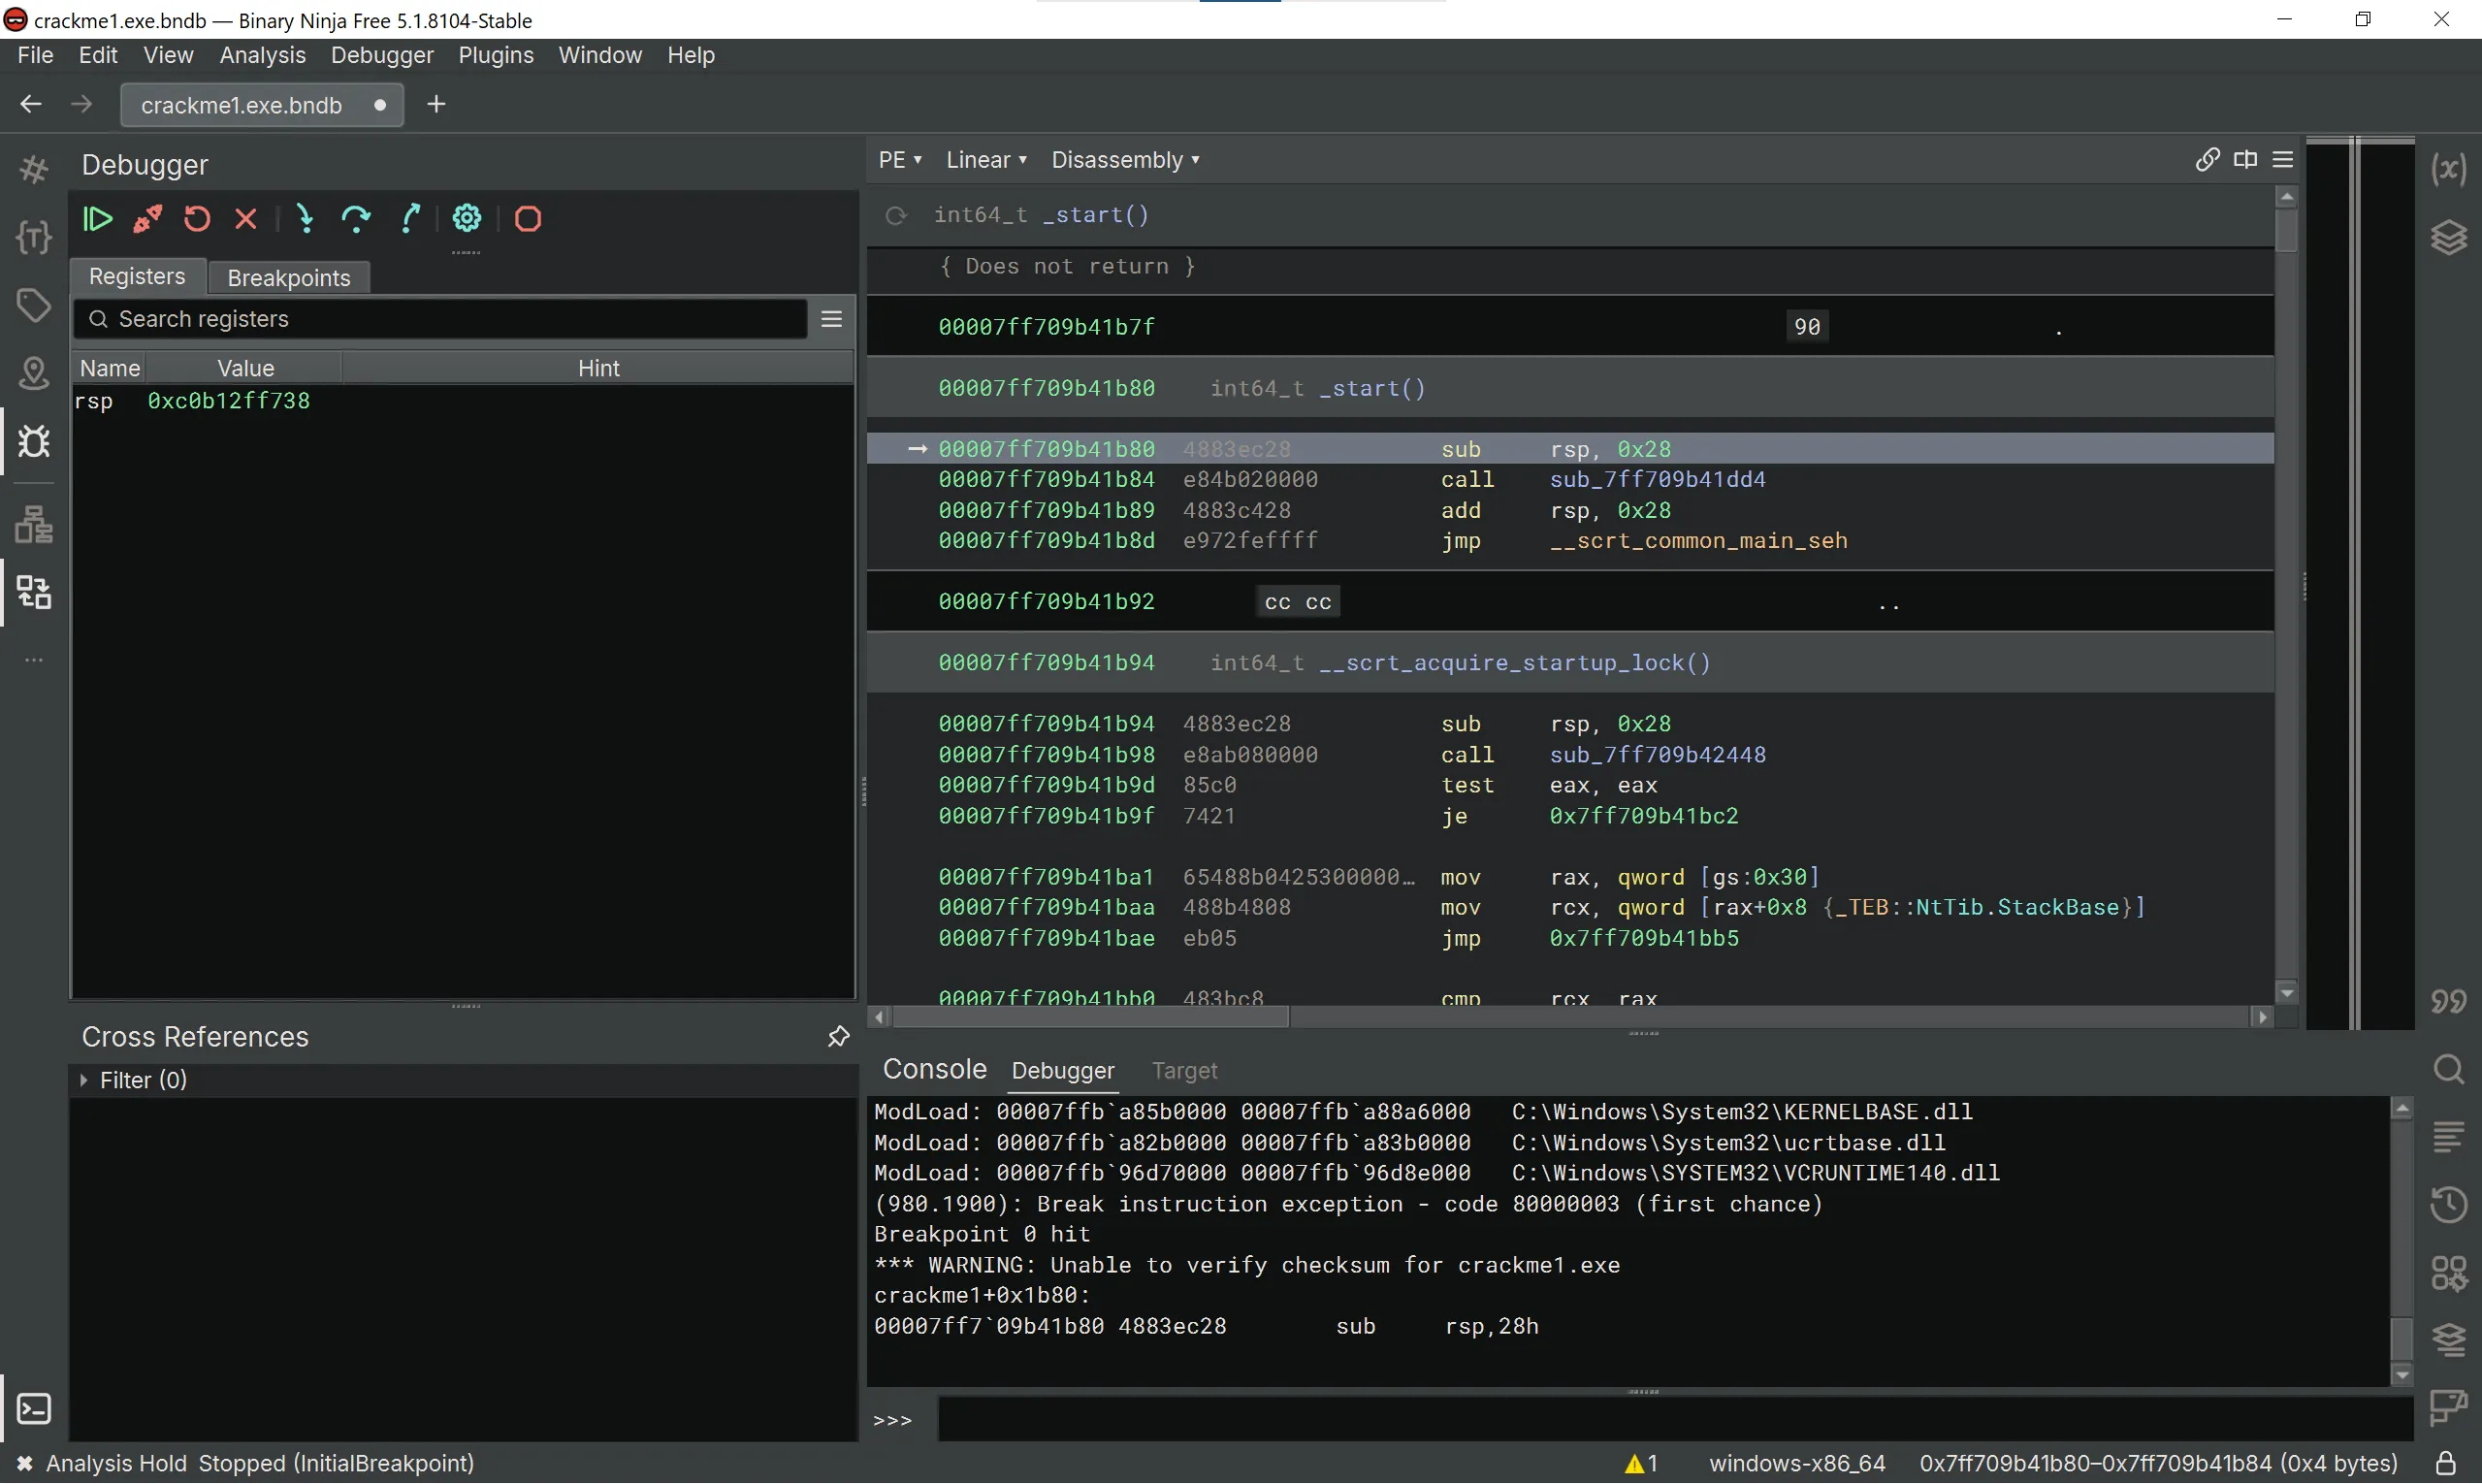
Now navigate to main() using the Symbols pane.
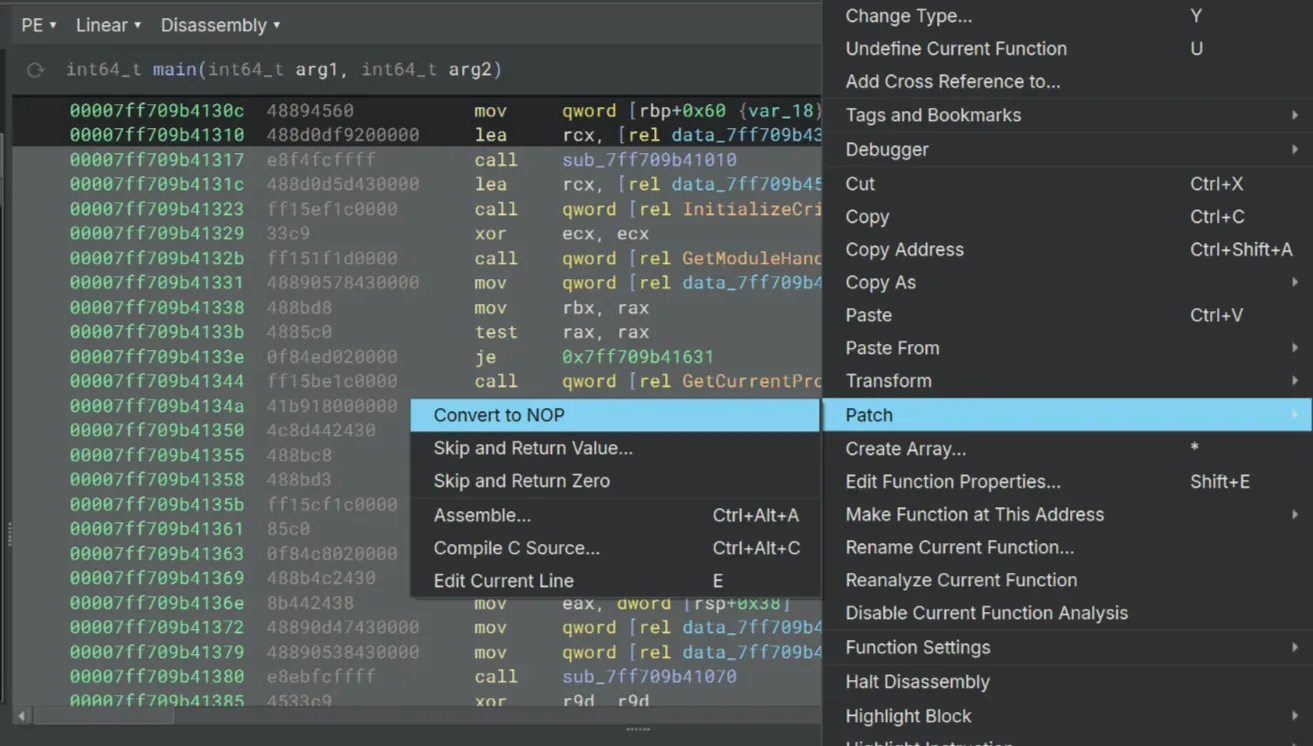
NOP-ing The Protections
I think this is probably the most straightforward way to do this. We’ll need to select all of the instructions between these two instructions at 140001310 and 1400013d2…
lea     rcx, [rel data_140003410]  {"[+] Starting application with PatchCRC protection.\n"}
...
; Select all instructions in here
...
lea     rcx, [rel data_140003470]  {"[+] CRC Monitoring Thread Started\n"}
…, right click on them and convert all of them to NOP.
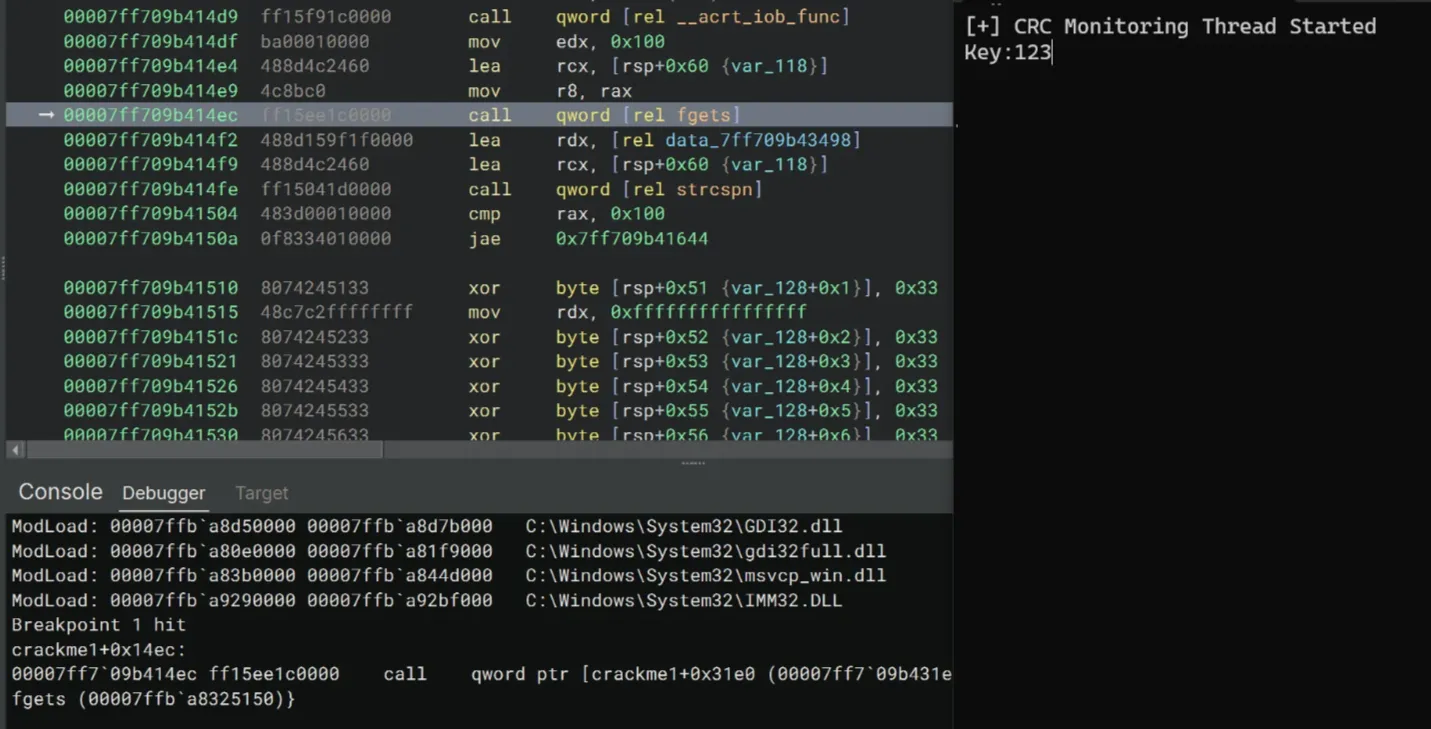
Then we can continue stepping through the disassembly. We also need to feed the crackme a random string to get past the fgets call. I’ll just type 123 and press return.
After going through the key-construction logic and the two loops which calculate the length of our input and the expected key, we arrive at this cmp rdx, rax instruction for comparing them.
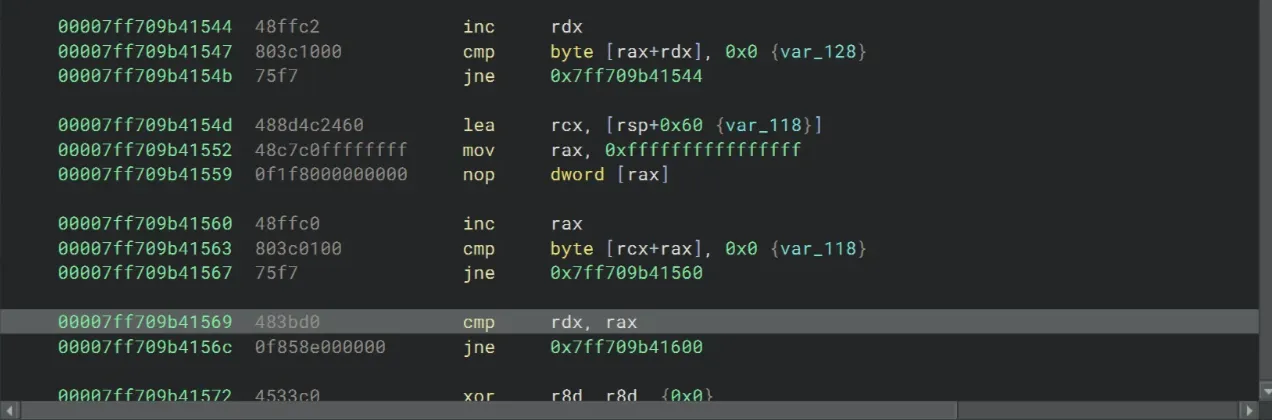
We definitely need to bypass the jne instruction, so let’s set a breakpoint after cmp.
>>> bp 00007ff709b41569
>>> g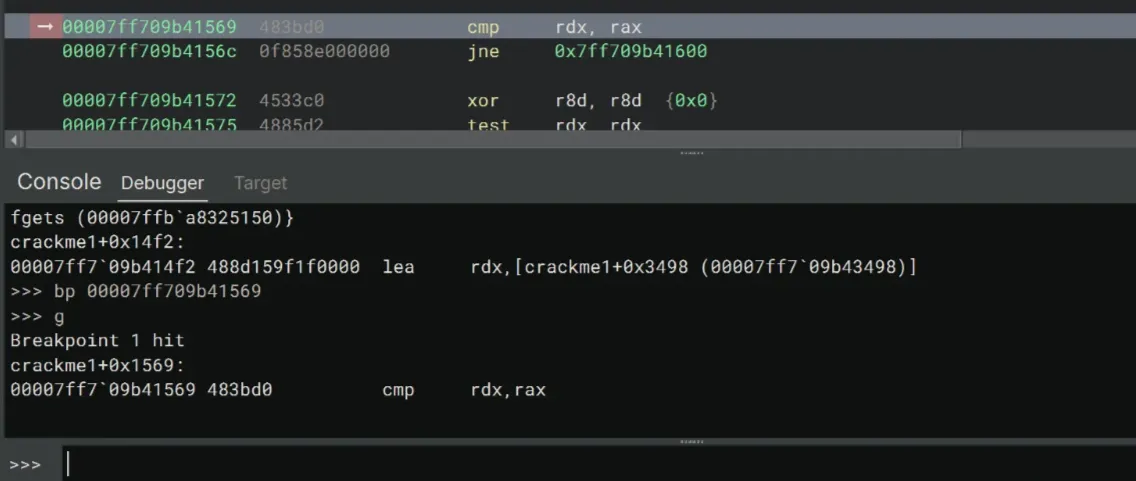
A quick glance at the register values using r shows that rdx and rax are indeed the length of the correct key and our input, respectively. We know this since rax has the value of 3, which is the length of the earlier 123 input key. We’ll set the value of rax to be the same as that of rdx.
>>> r rax=7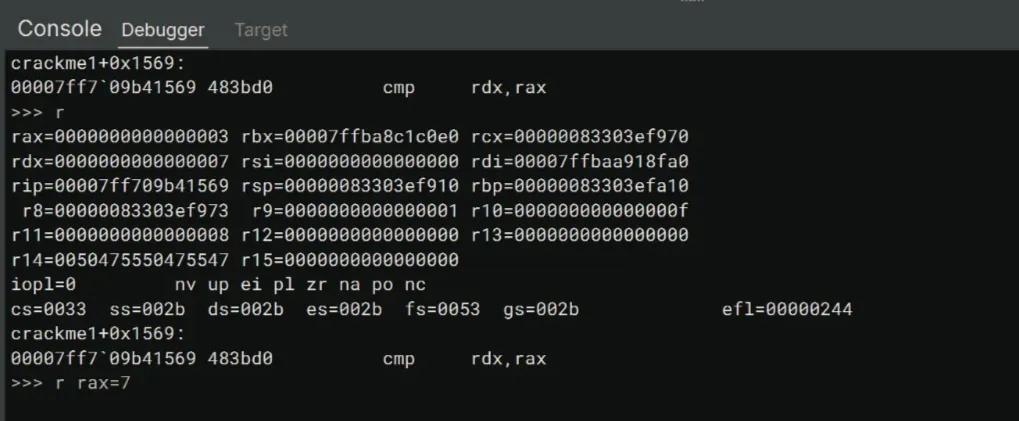
We eventually reach the loop where the crackme compares the content of the two keys.
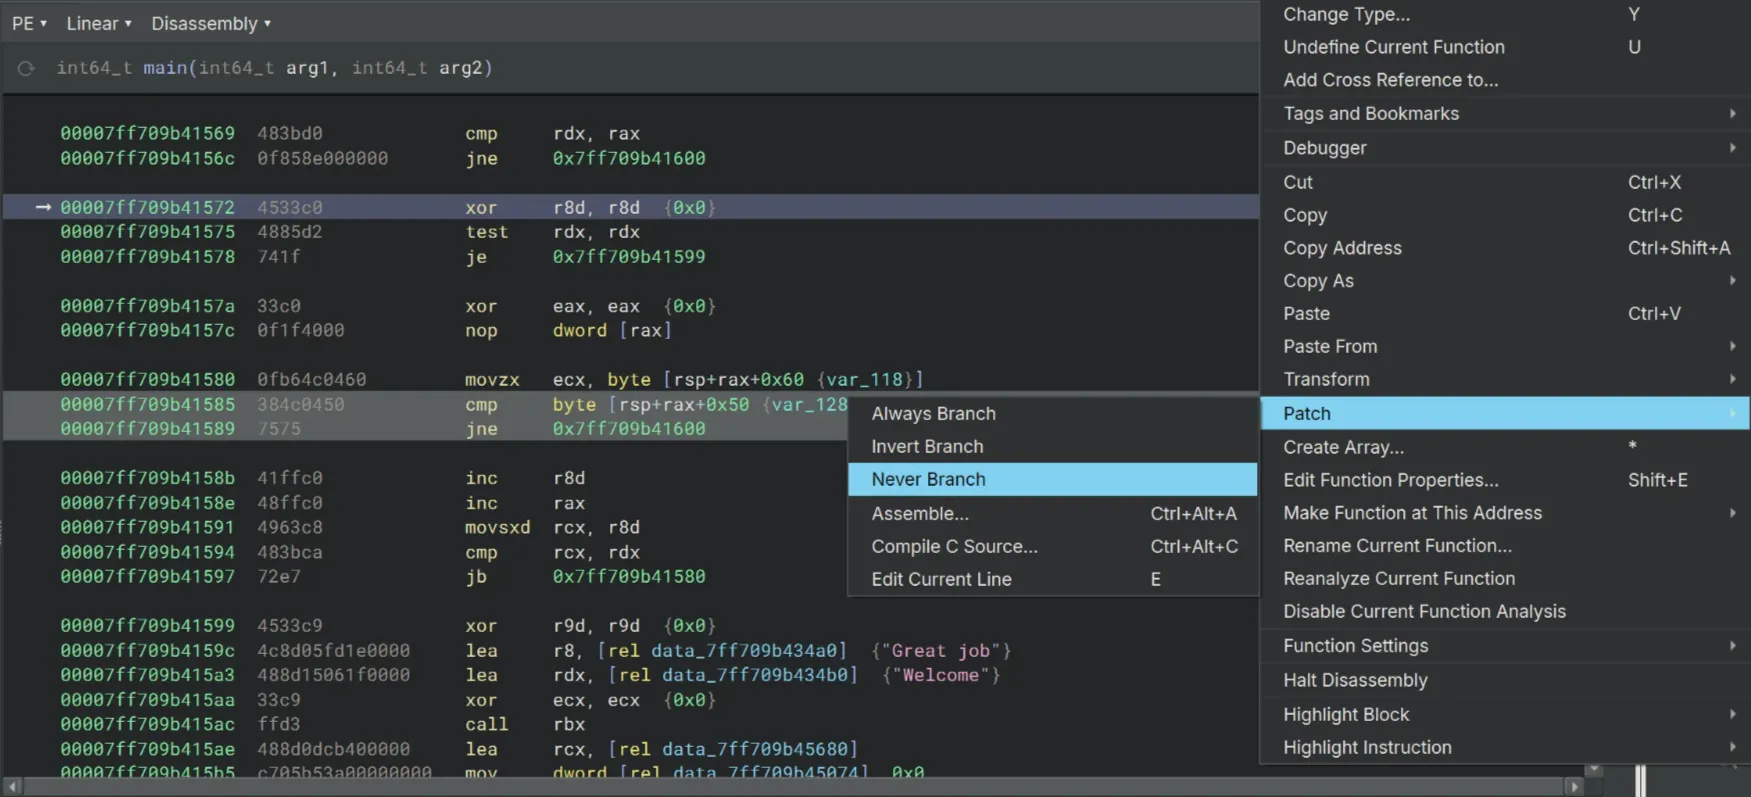
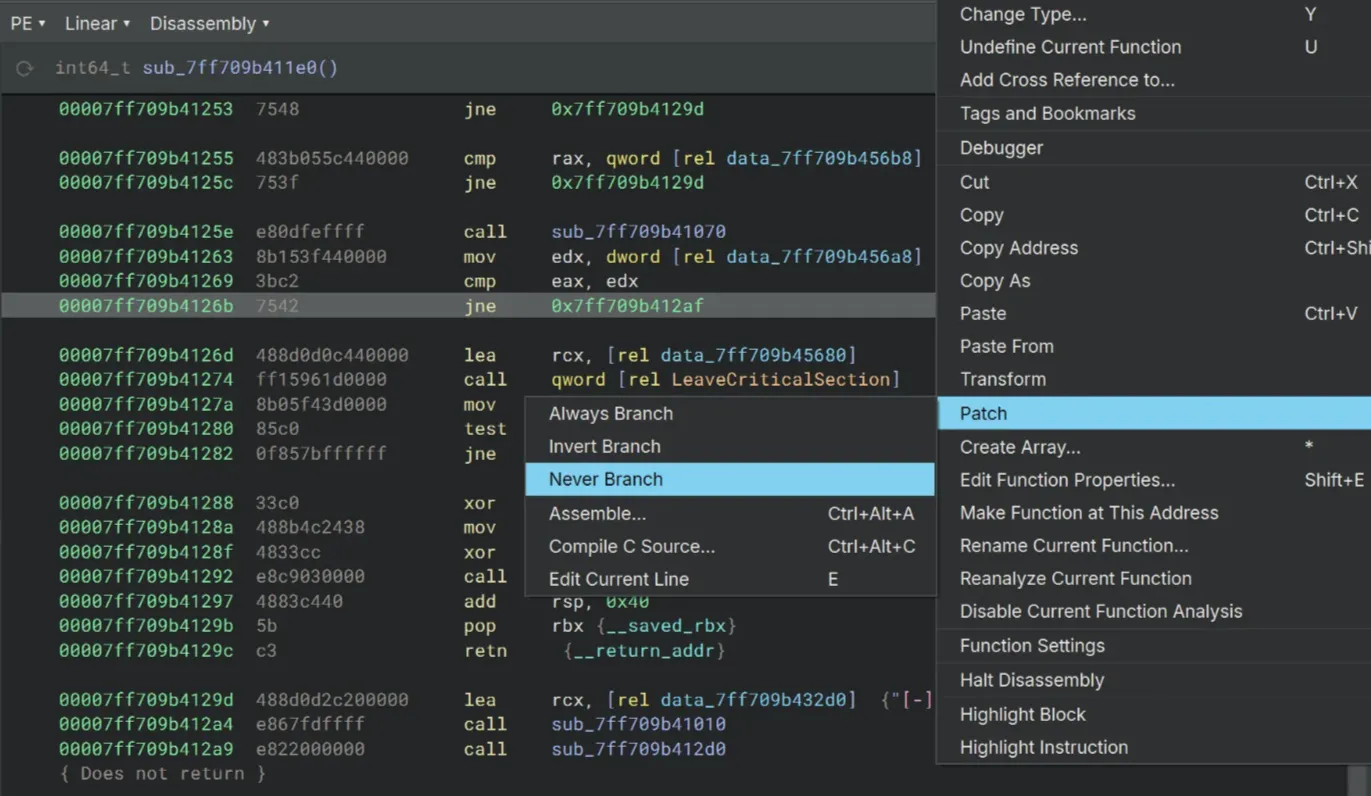
At the jne instruction underneath the cmp byte [rsp+rax+0x50], cl, do a right click, select Patch and choose Never Branch to bypass the jump when the loop reaches an incorrect character.
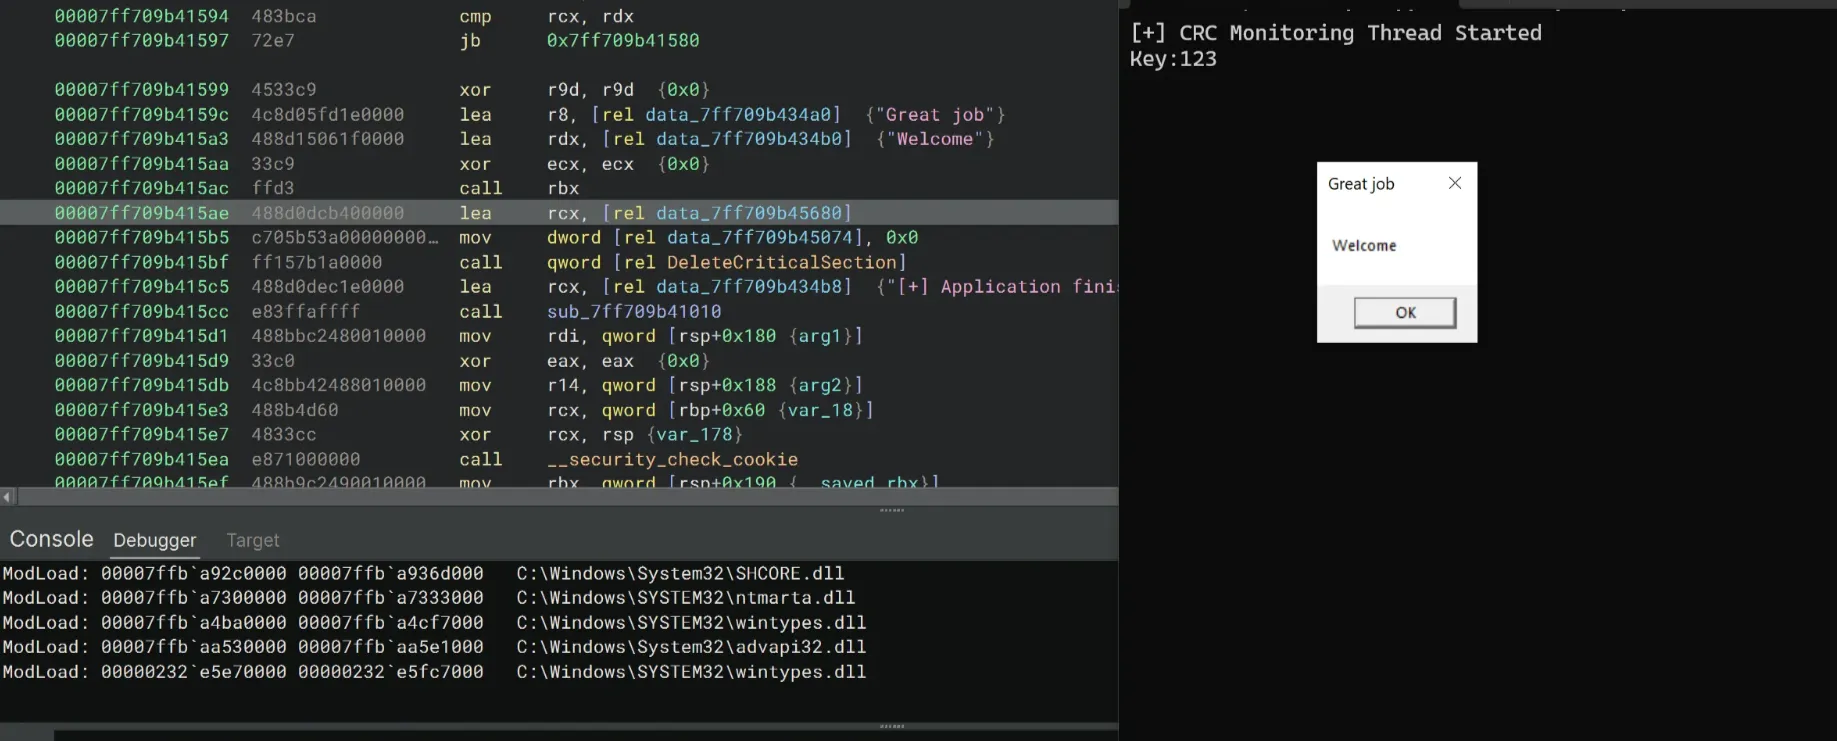
Let the code continue and we finally got the Welcome message box!
Skipping A Bad Jump
The above approach of NOP-ing is a little bit brutal I guess. Let’s analyze the patch protection part. Here’s what happens when we let the crackme run past the protection while debugging:
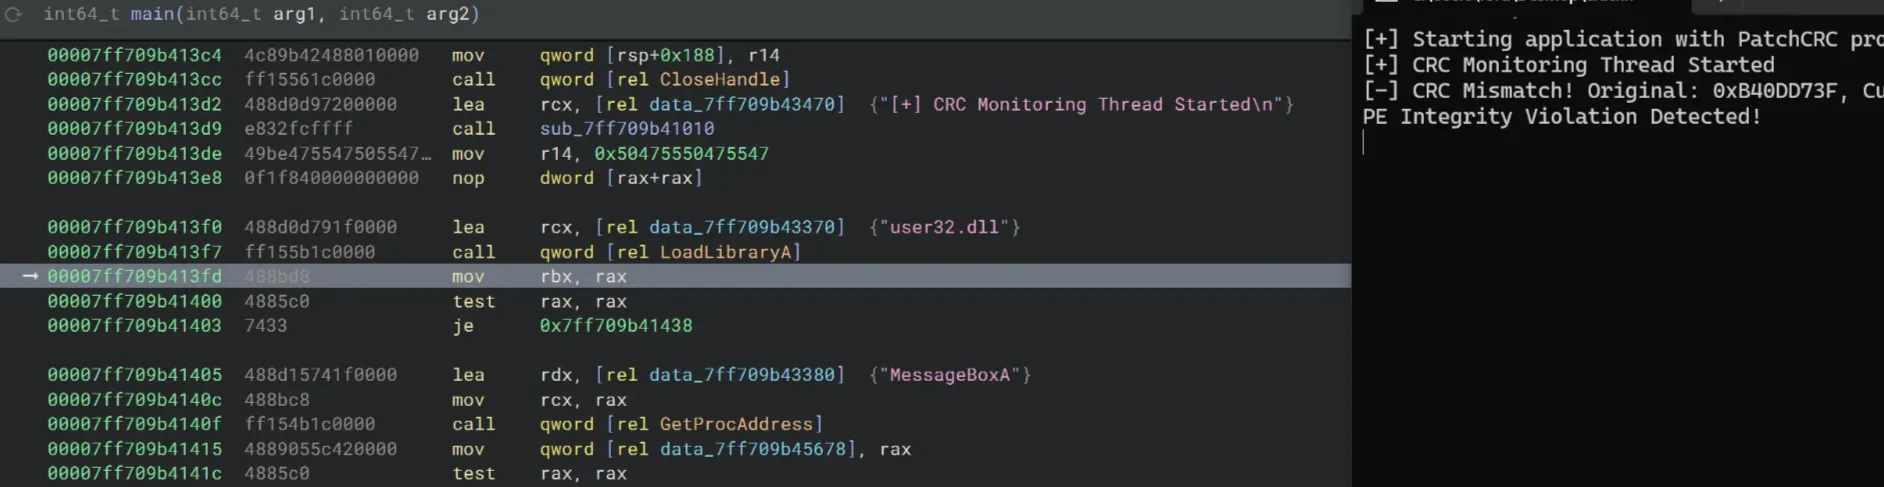
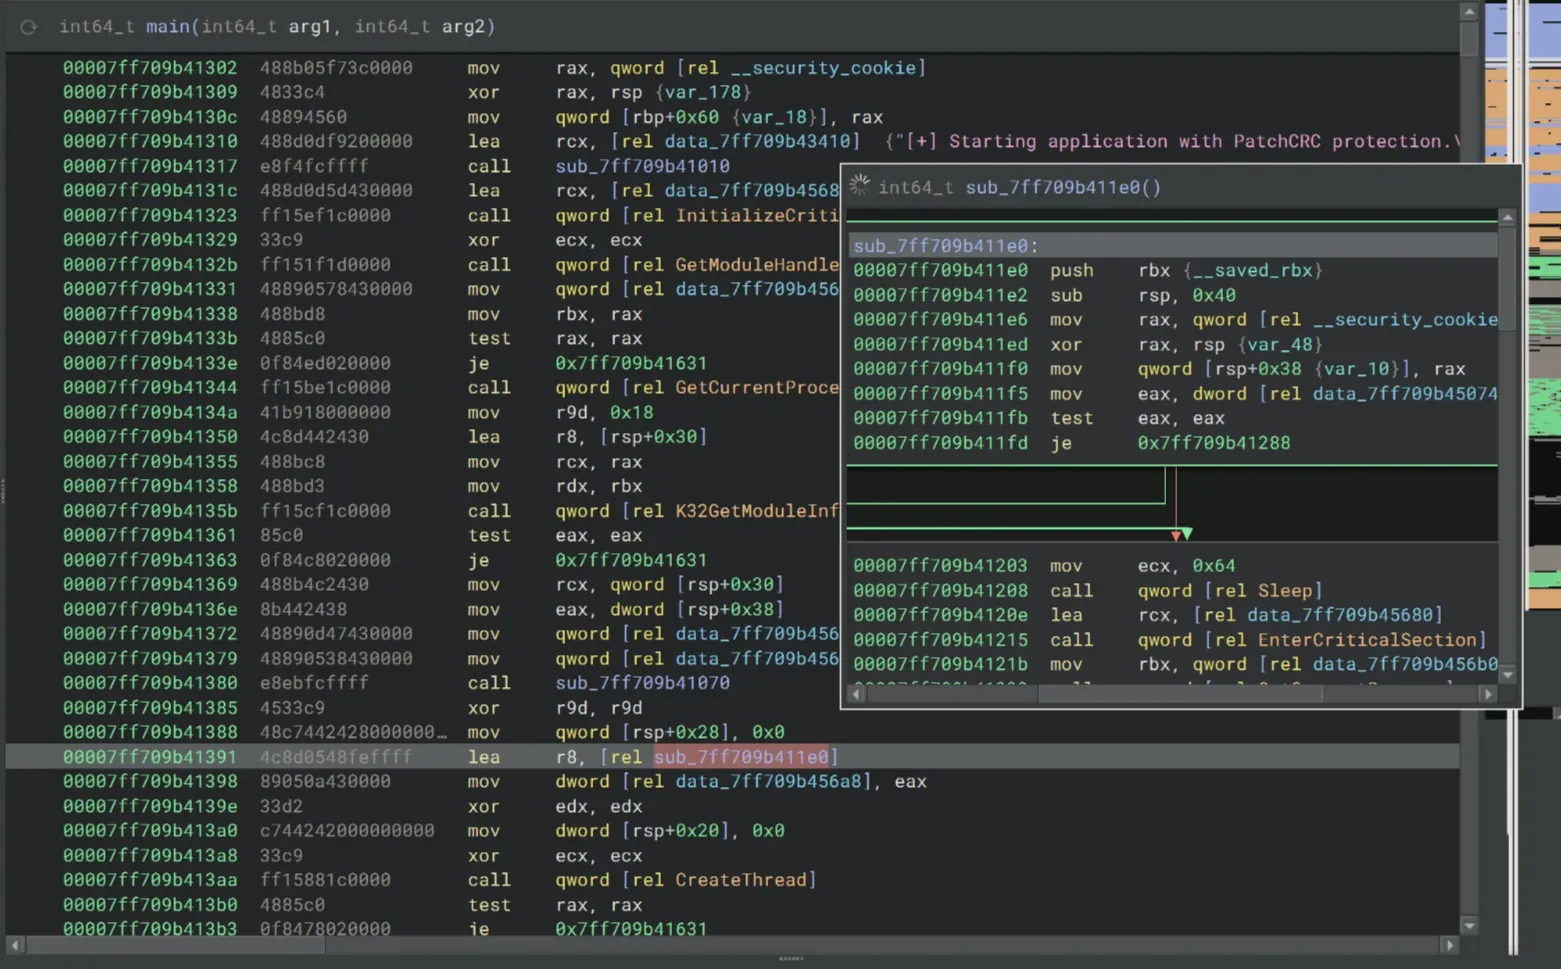
With some digging, it seems that sub_7ff709b411e0 is the patch monitoring function. The crackme spawns a background thread that repeatedly checks the host module for tampering with the sub_7ff709b411e0 function. This function is then passed into the CreateThread call as an argument. We’ll be patching the executable after the background thread has been created.
When we inspect sub_7ff709b411e0, there’s a jnp instruction that leads to the CRC Mismatch part. We need to bypass this jump.
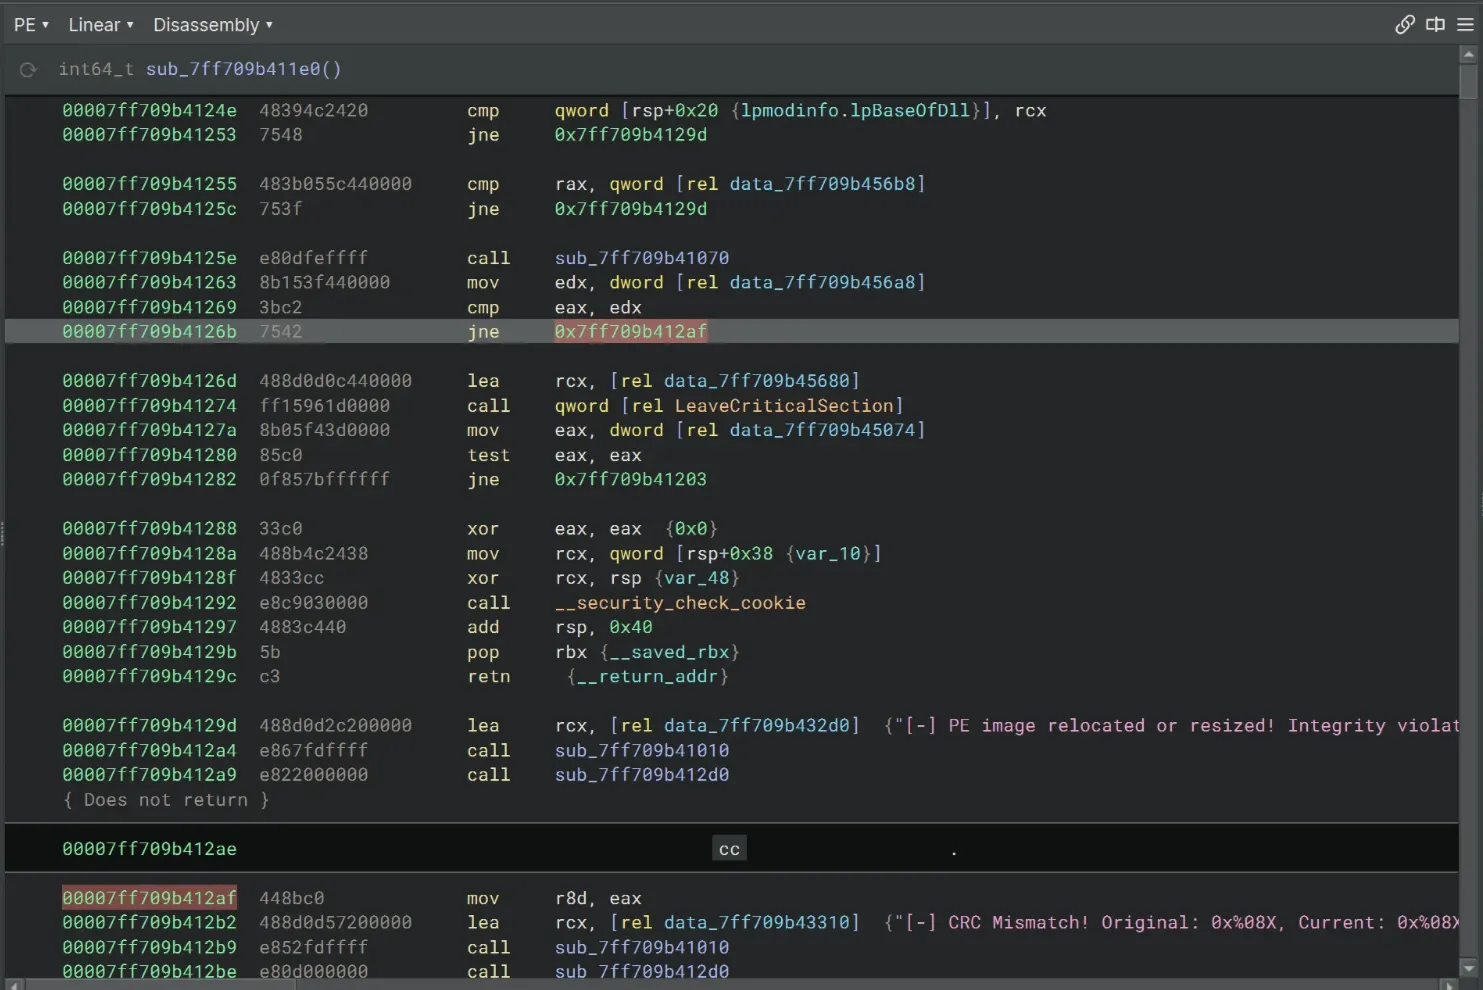
Once again, right click on the instruction, then choose Patch → Never Branch.
Then we can continue executing the crackme normally!
Dumping From Memory
There’s also another way to get the correct key, using a debugger.
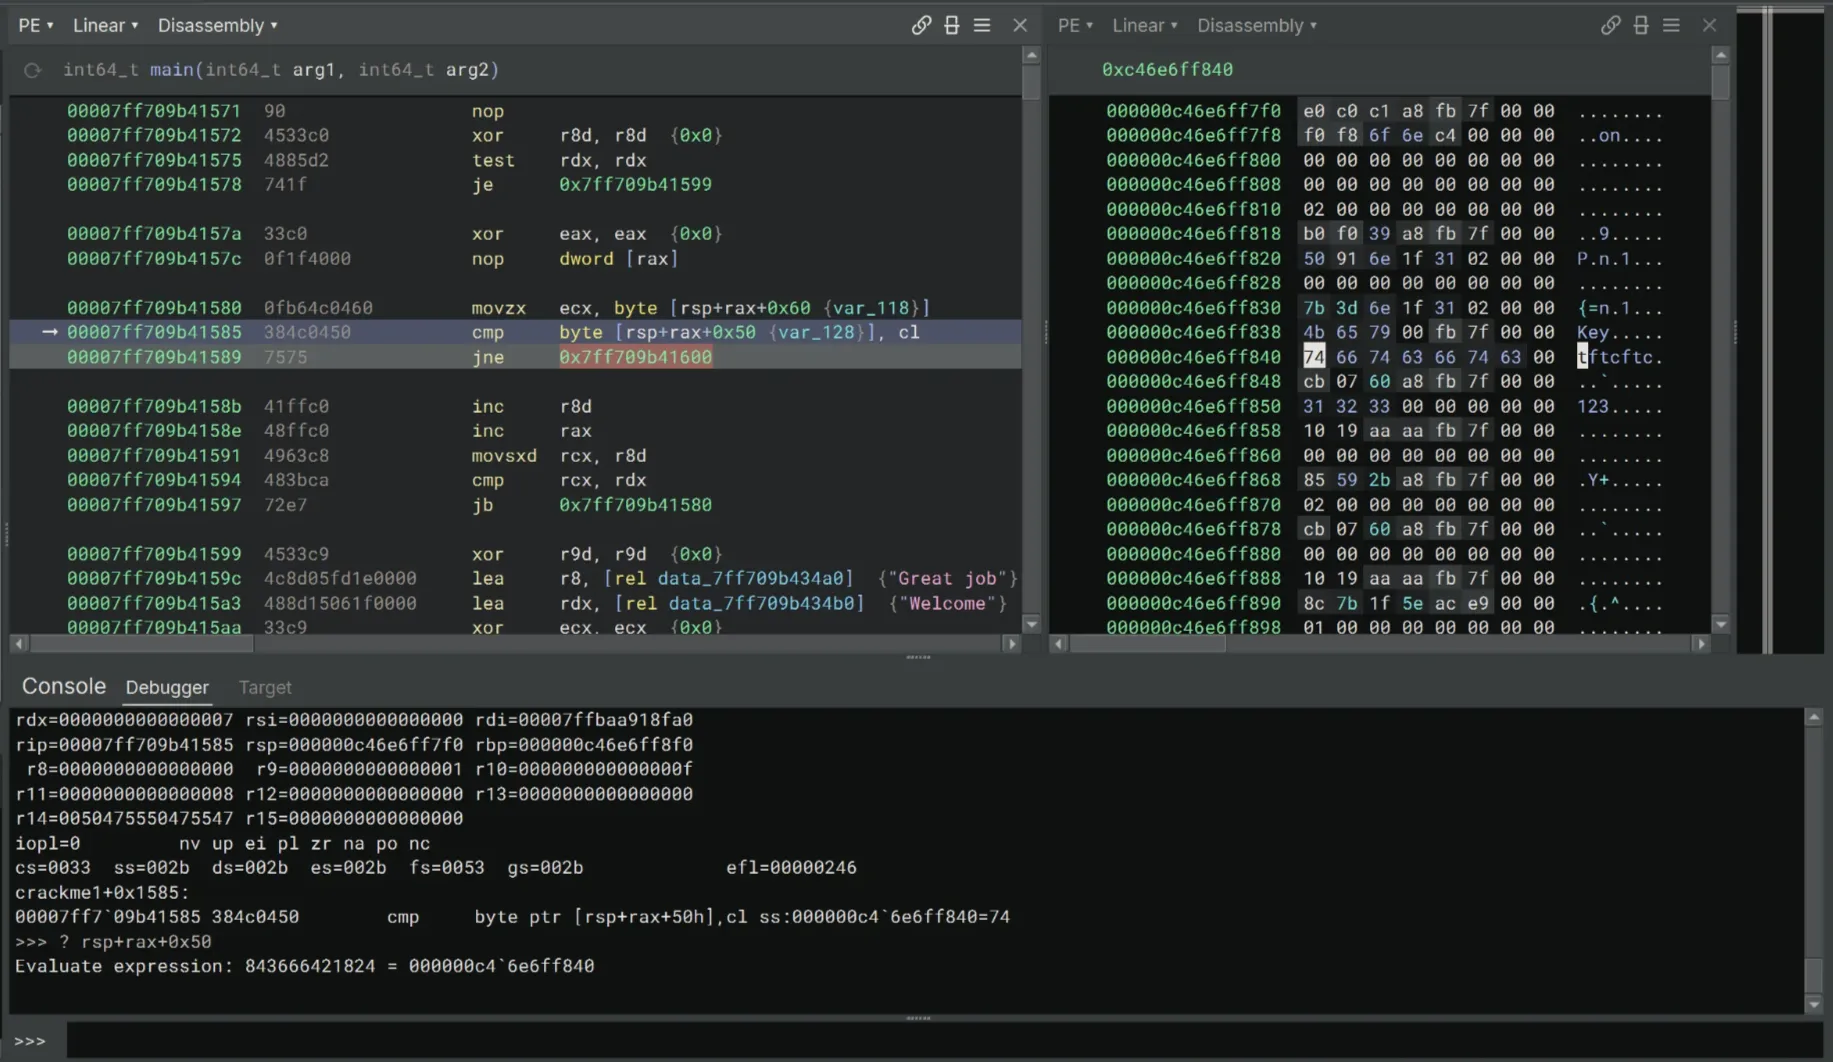
When we reach the character comparison instruction cmp byte [rsp+rax+0x50], cl, it’s possible that rsp+rax+0x50 is the location where the correct key is stored.
We can quickly spin up the Stack View from Debugger Menu → Create Stack View. Now we need to find the address of the key at [rsp+rax+50]:
>>> ? rsp+rax+0x50
Evaluate expression: 843666421824 = 00000c4`6e6ff840
In the Stack View, navigate to 00000c46e6ff840. We found tftcftc!
Thoughts
This is a nice crackme tbh, with the key can be found statically pretty easily though. The patching wasn’t difficult since the strings before/after the protections launch really helped me to get an idea where to bypass these checks.
I’ve learned so much from solving this crackme. I’ve only started using a debugger since my previous post crackmesone — git's simple crackme medium-hard, but now I’m starting to feel comfortable using it! This is my first time using the Patch feature and the Stack View of Binary Ninja as well, and these are super powerful tools.
Also, there’s the v2 version and the lite version of this crackme. I’ll definitely checking them out in the future!